
F3, [Form From Function], was a playful, professional and powerful 3D design app that enables you to live code 3D form, rapidly iterate on its design, and export for 3D printing, rendering, animation or whatever your heart desires. It was available on the Mac App Store from 2018 to Dec 2020.
Most design programs represent form as polygons, vertices and/or bounded surfaces. This is where F3 differs! It uses signed distance functions (SDFs) to build forms. SDFs are a magical way of thinking about space, time and form. They allow you to create more interesting geometries and perform more complex modification operations. Check out shadertoy.com to see what people are making and doing with them.
Think of F3 as a translator that converts your scene of SDFs into a 3D file format (OBJ, STL) that other apps like Octane (high-fidelity rendering), Maya (animation) and Preform (3D Printing) can use.

What makes F3 Unique:
It builds upon what is amazing about the industry's most experimental 3D design applications. Like Processing, F3 offers a highly responsive live coding environment. It also features a GPU accelerated real-time rendering engine and a functional and algorithmic approach to form making like OpenSCAD, opening up new design possibilities. With F3, your imagination is the limit!
Most CAD software use boundary representations (B-Reps) and operations like extrudes and revolves to create and represent form. This works well for most modeling applications, however B-Reps constrain the types of forms that can be made and how those forms can be modified. F3 uses functional representations (F-Reps) a la signed distance functions and therefore can create more complex geometries, perform more complex modification operations to these geometries and represent forms that have different material compositions. For example, instead of just having boolean operations like, combine, subtract and intersect, F3 gives your the power to blend shapes together and even morph one shape into another:


Furthermore, F3's interface is unlike anything before. Its end user experience is heavily influenced by Bret Victor's talk: Inventing on Principle. Its interface is built to give you immediate feedback while changing code and/or parameters, thus not only is F3 a powerful tool for designing form, its a great teaching & research tool. If you want to get deeper into understand the mathematics of SDFs and learn more about procedural / algorithmic design, F3 will help you explore and understand how to bend space!


Ideology & Origins:


F3 evolved out of the idea of being able to design 3D forms using 2D image cross sections. Imagine a stack of 2D concentric circles of the same size on top of each other, in 3D this would make a cylinder. Further, a sphere is just a 2D circle that changes its radius along its perpendicular axis. Now imagine being able to use a pixel shader to define any arbitrary shapes that changes along its perpendicular axis!
The possibilities are endless. F3 is a tool for discovering forms we haven't be able to discover / design with the tools we have today! F3 hopes to push forward the future of form finding.
Quick Start:
Download the app from the Apple App Store. By default it will be installed your applications directory (i.e. /Applications)
Open the F3 app and set your default text editor for editing the code: Editor > Set Editor
Open the text editor by: Editor > Open Editor. This will open the shader folders ( Common & Scene ) in the text editor you've set!
Edit the file: Scene / scene.glsl. Upon saving F3 will automatically update the rendering and meshing window!
If you'd like to use an external glsl file, place it in the Common folder and include it in your scene.glsl file: #include "[your glsl file].glsl"
Remember to save your session: Session > Save As otherwise F3 will overwrite your files once you create a new session or load a session.
Check out the Examples that come bundled with the app: Examples > Playground > Space Puppy
Suggest a feature or report a bug: syed.reza.ali@gmail.com or @rezaali
Detailed Guide:
You've made it this far and chances are you'll become a F3 power user and GLSL & SDF wizard in no time. The following will outline how to get up and running with F3 and give you more information about what you can do with F3!
Disclaimer: Since its a developer / designer focused tool, please forgive its complexity. Just know it will handsomely reward you with insanely cool 3D printable files and badass images / quicktime movies that you can share with the world once you're accustomed to how it all works)!
Download From App Store:
First things first, download the app from the App Store! By default, F3 will get installed in your /Applications folder. I'd also suggest putting it in the dock if you're going to be using it a lot!
Interface Overview:
Before we dive into the app, lets check out the F3's UI & windows so we are all on the same page! F3 provide three different rendering windows and one window for tweaking parameters (that you expose from comments in your GLSL code)!
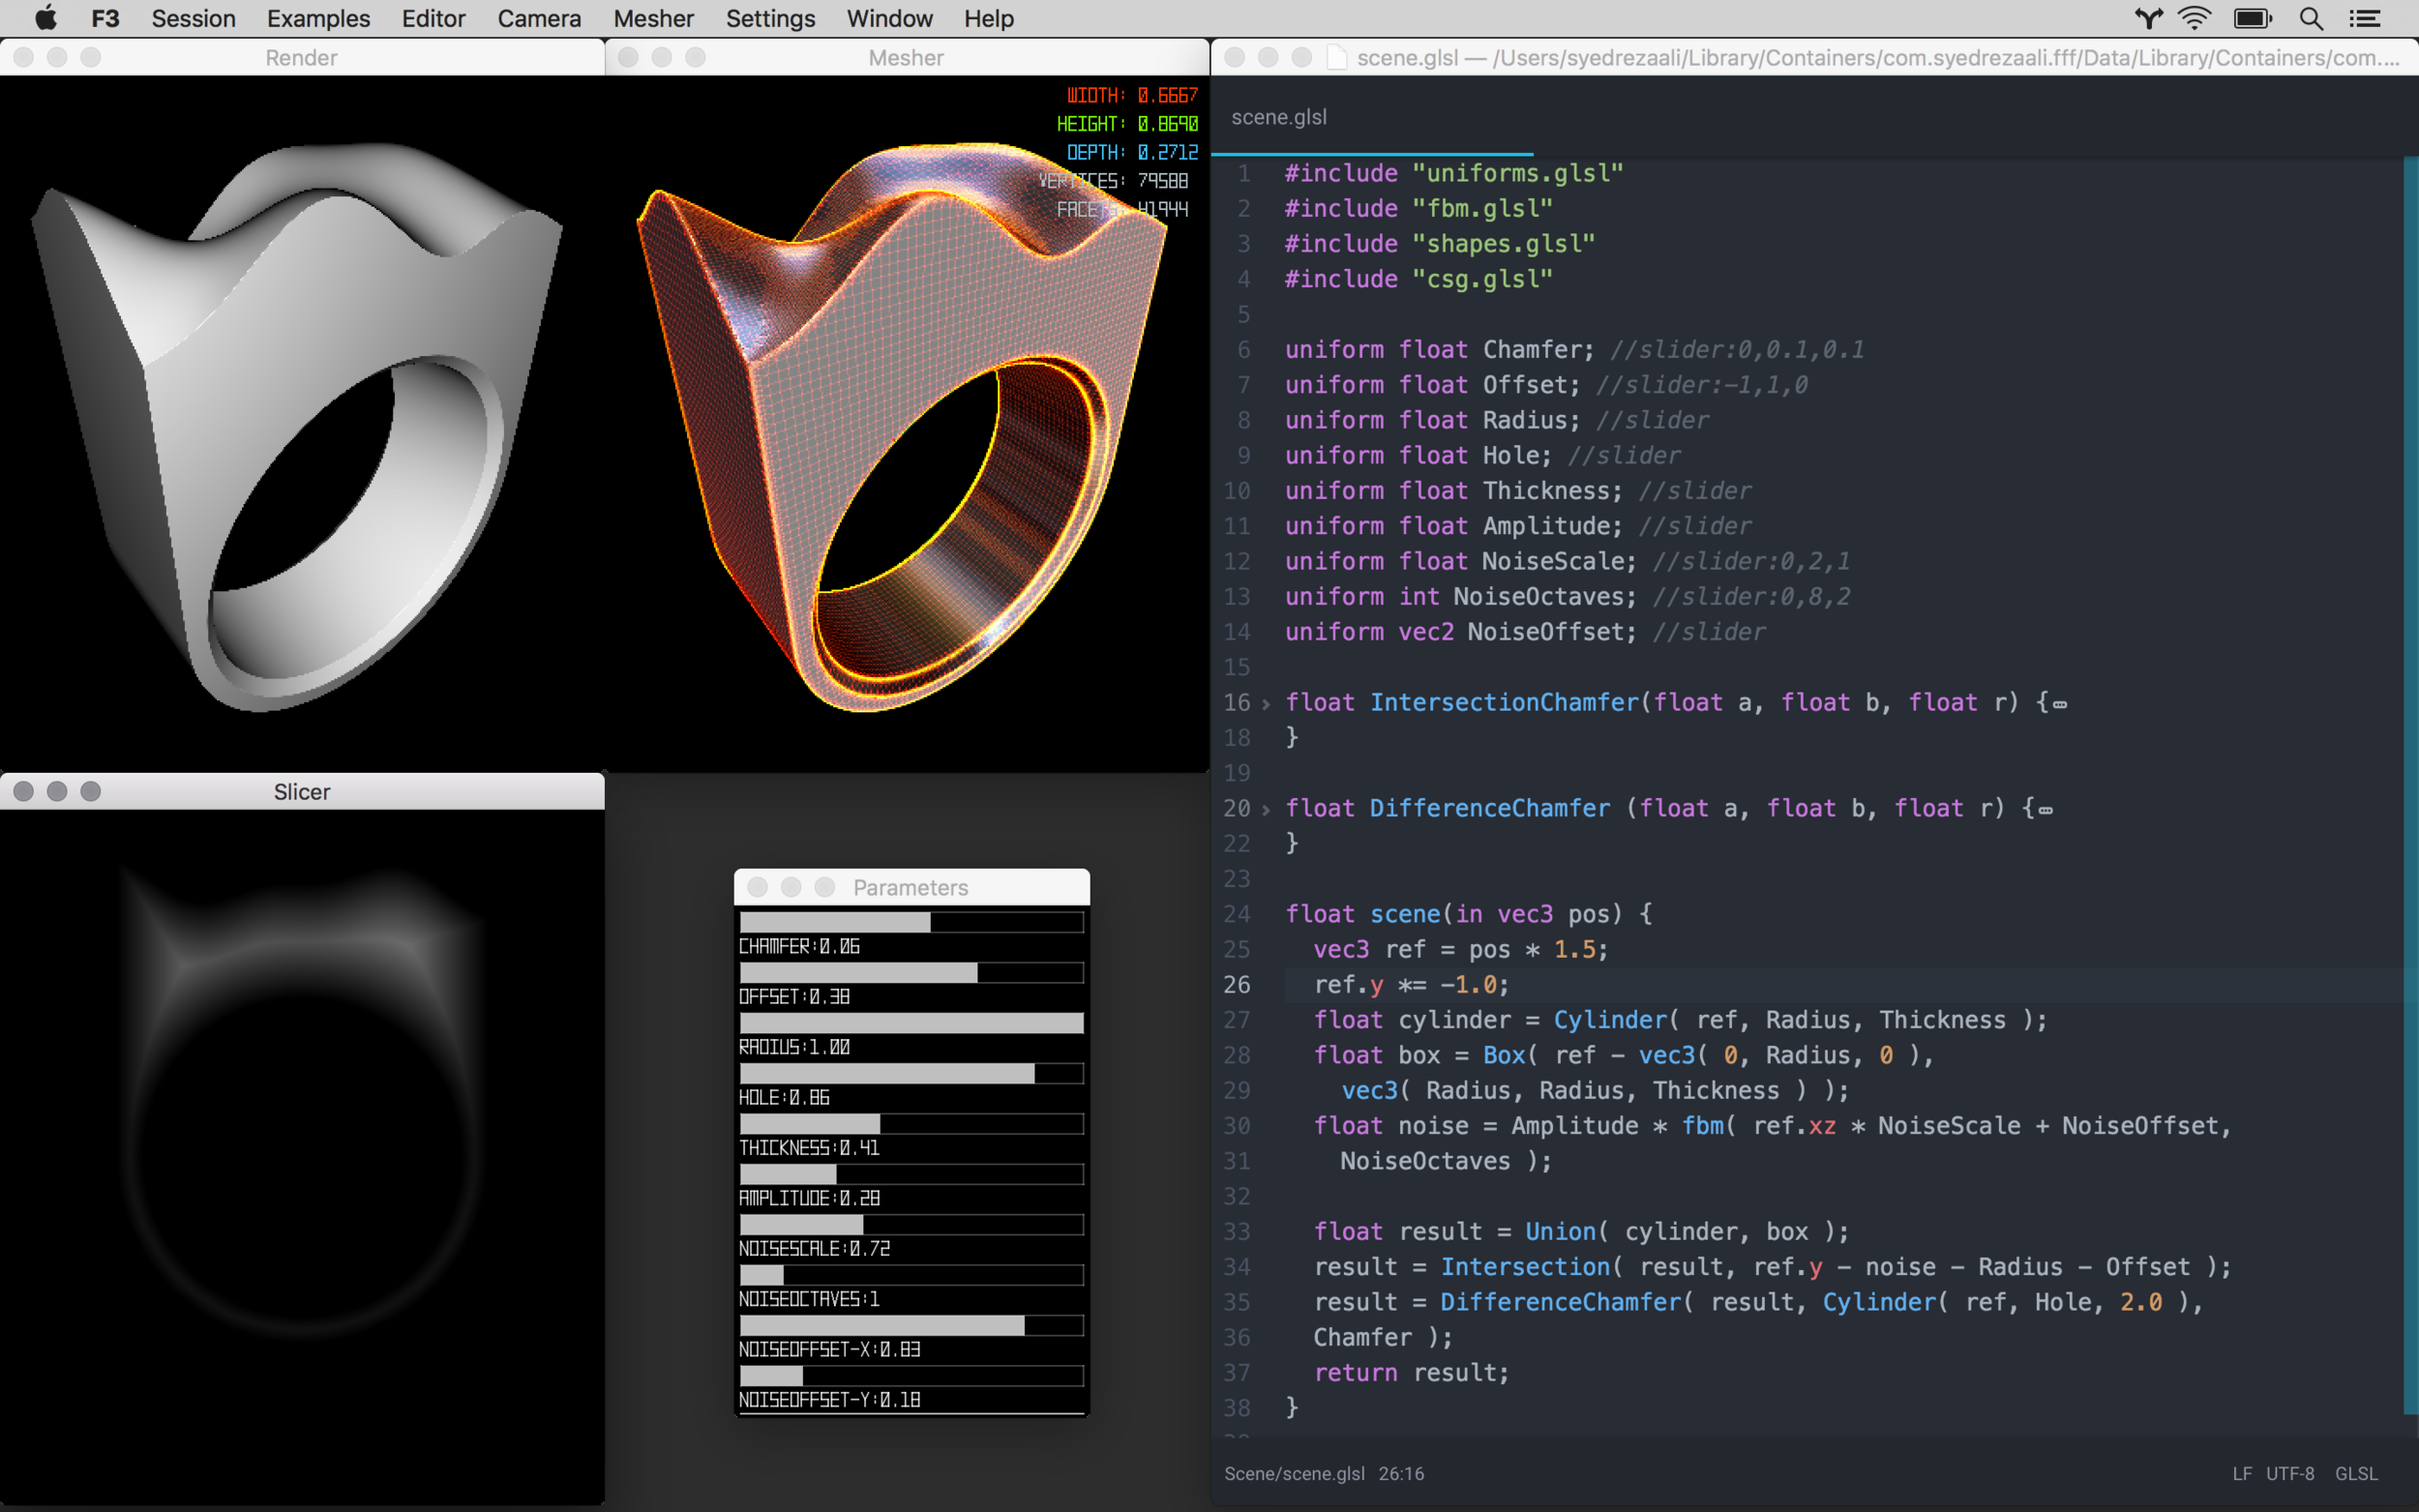
Render Window (Top Left):
The Render window shows a real-time rendered (ray marched) preview of your form. You can preview changes to your form in real-time here. This window is great for getting immediate feedback when tweaking size or features like chamfers, fillets, blends, transformations, etc. You can click and drag in this window to navigate space. A three button mouse is suggested for navigating!
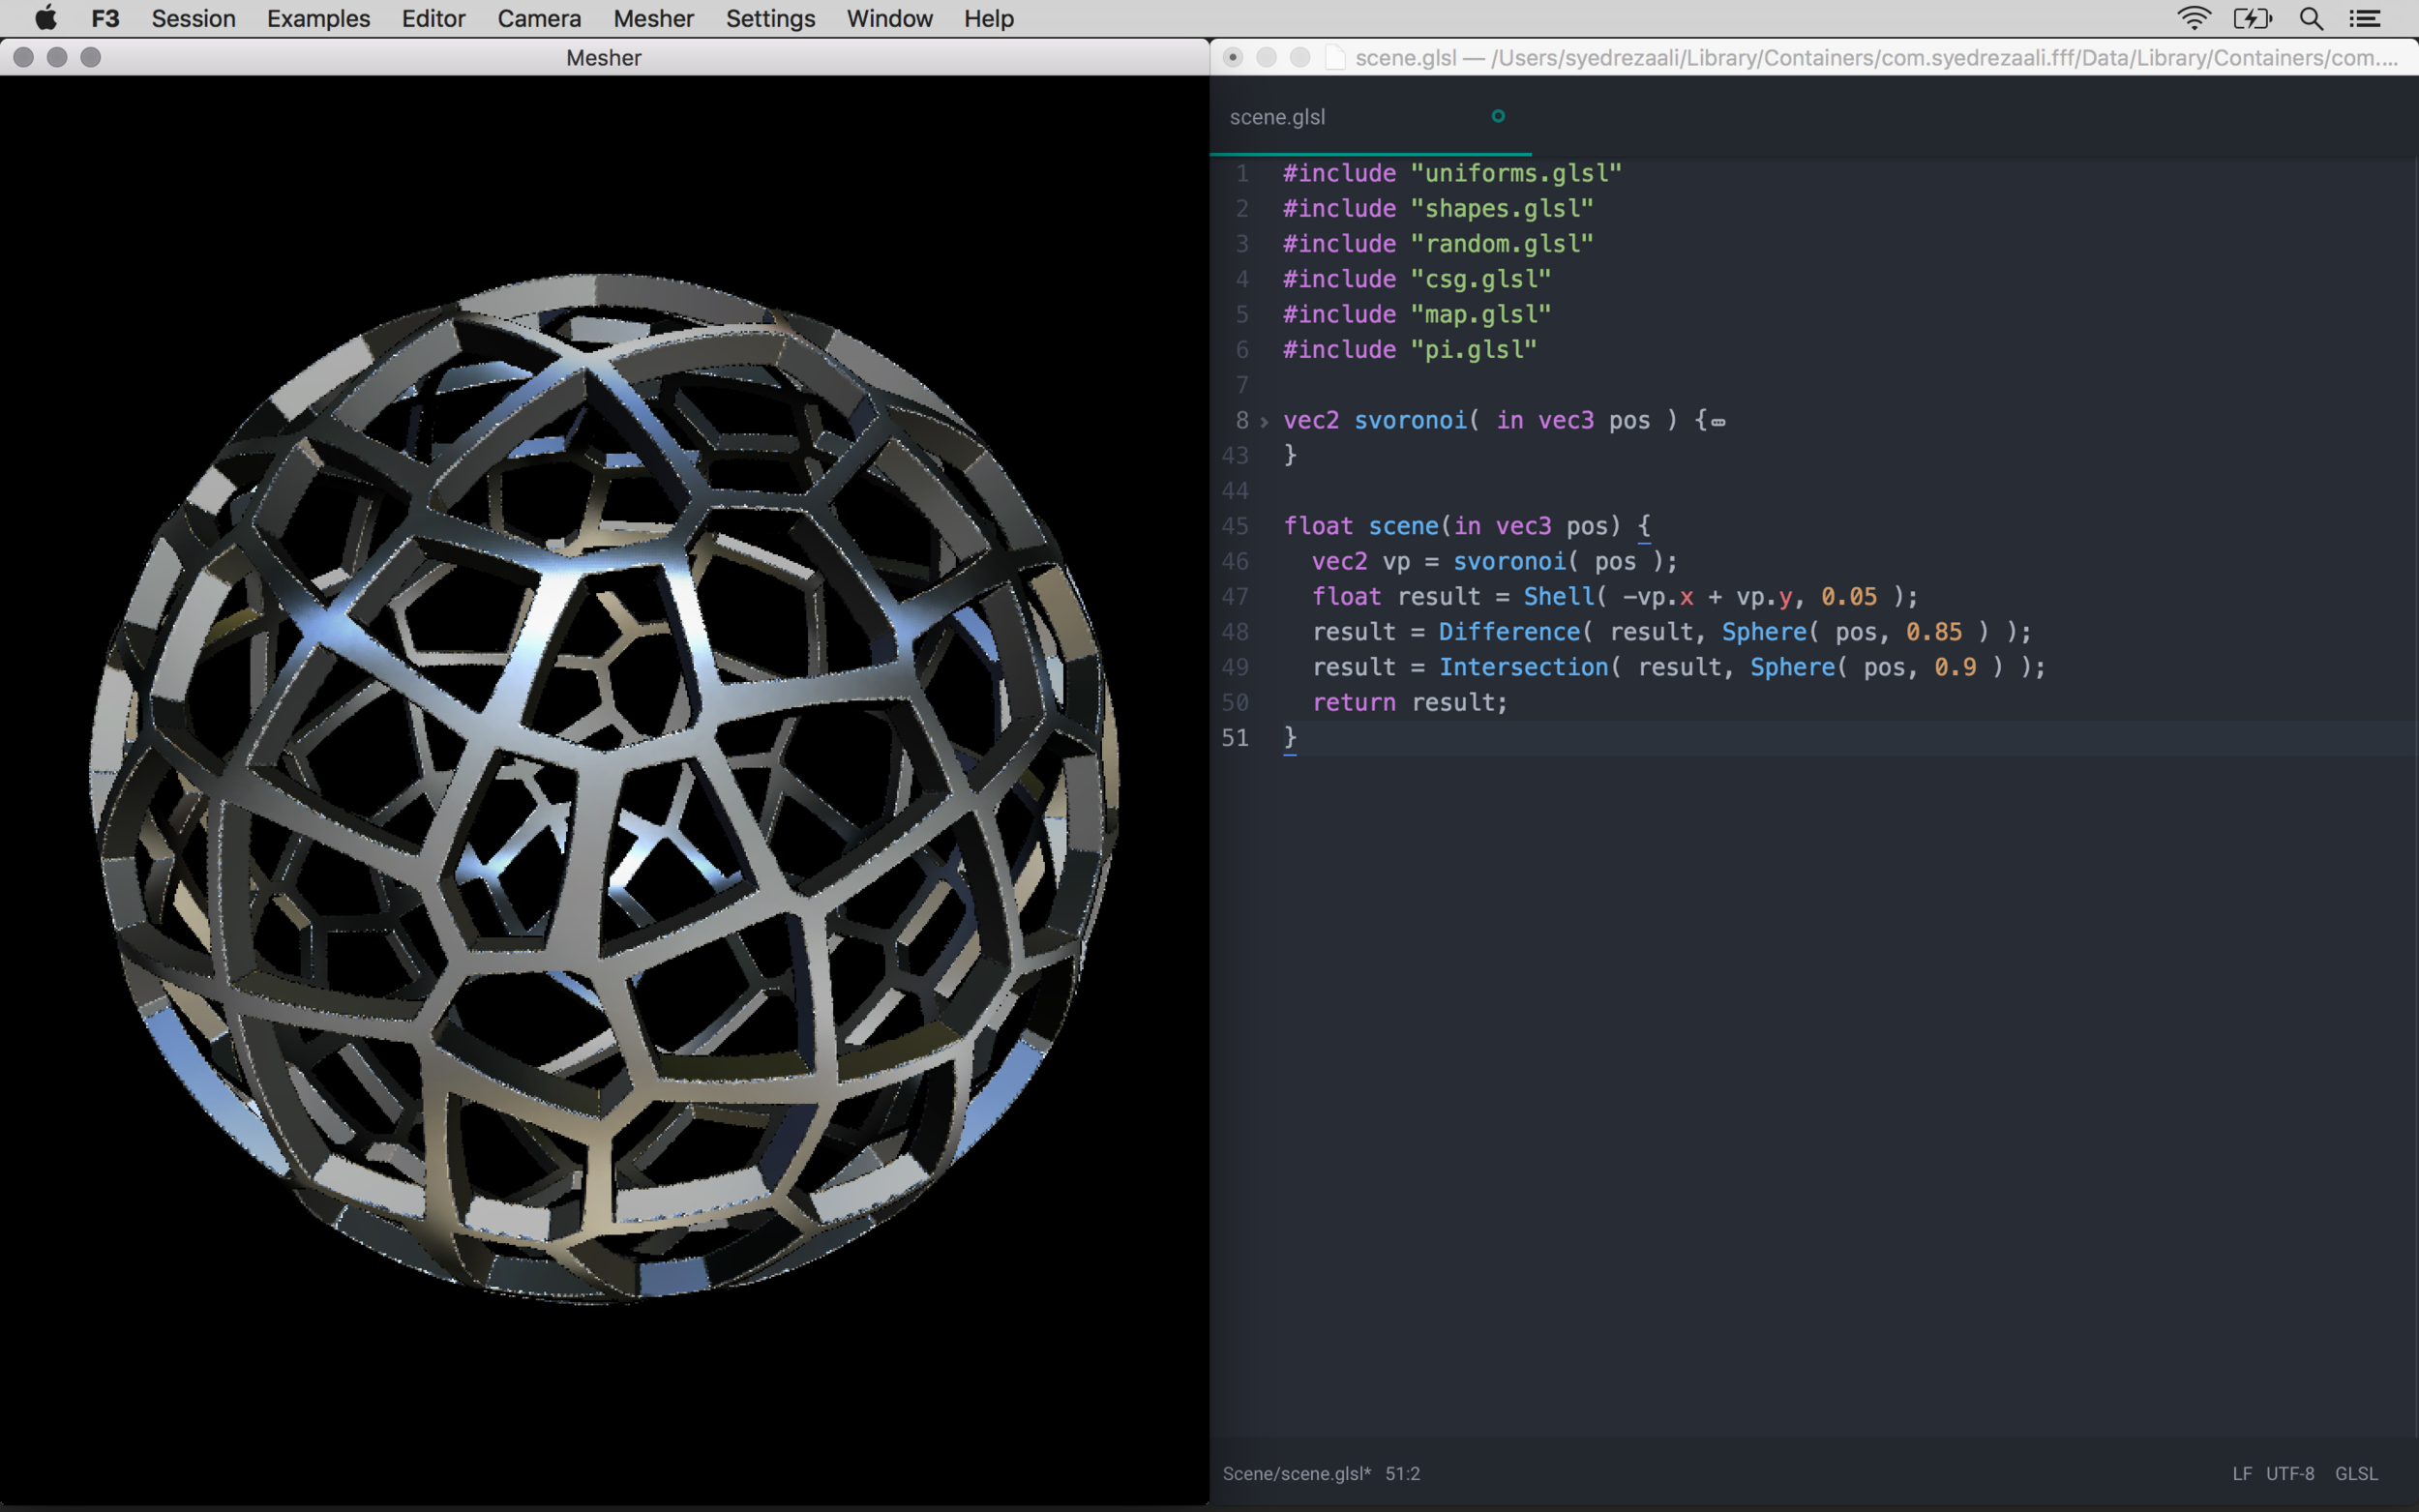
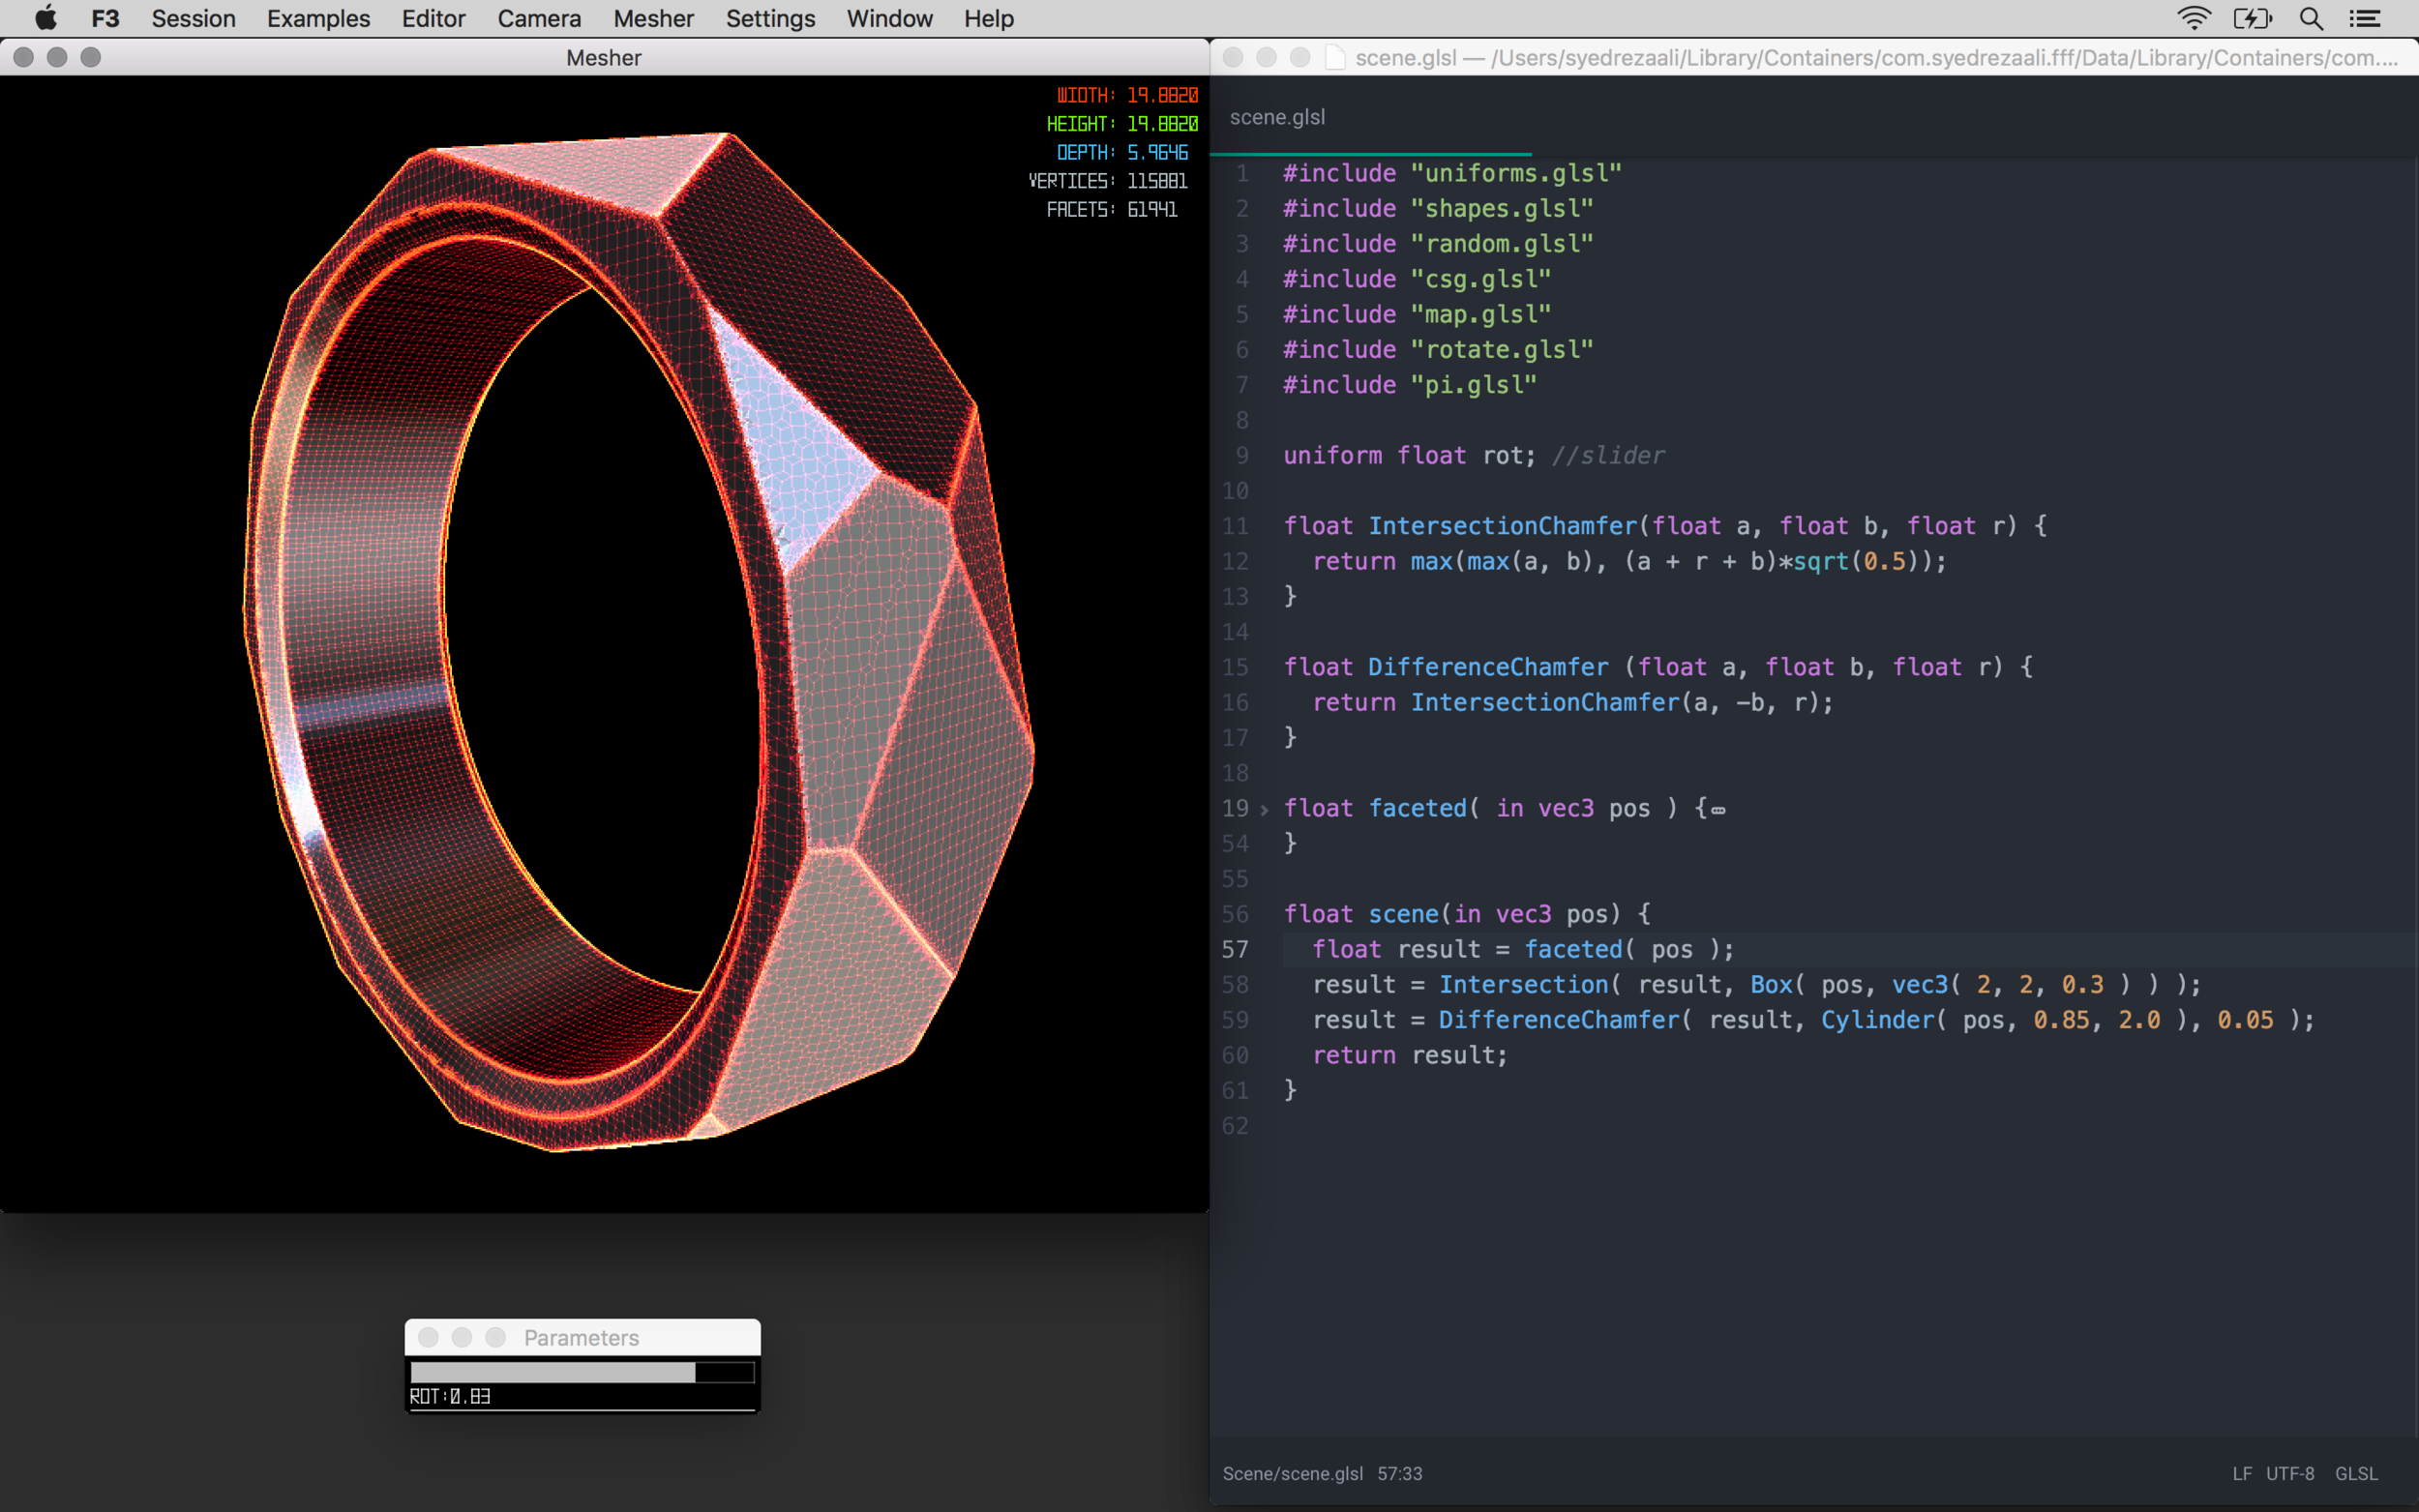
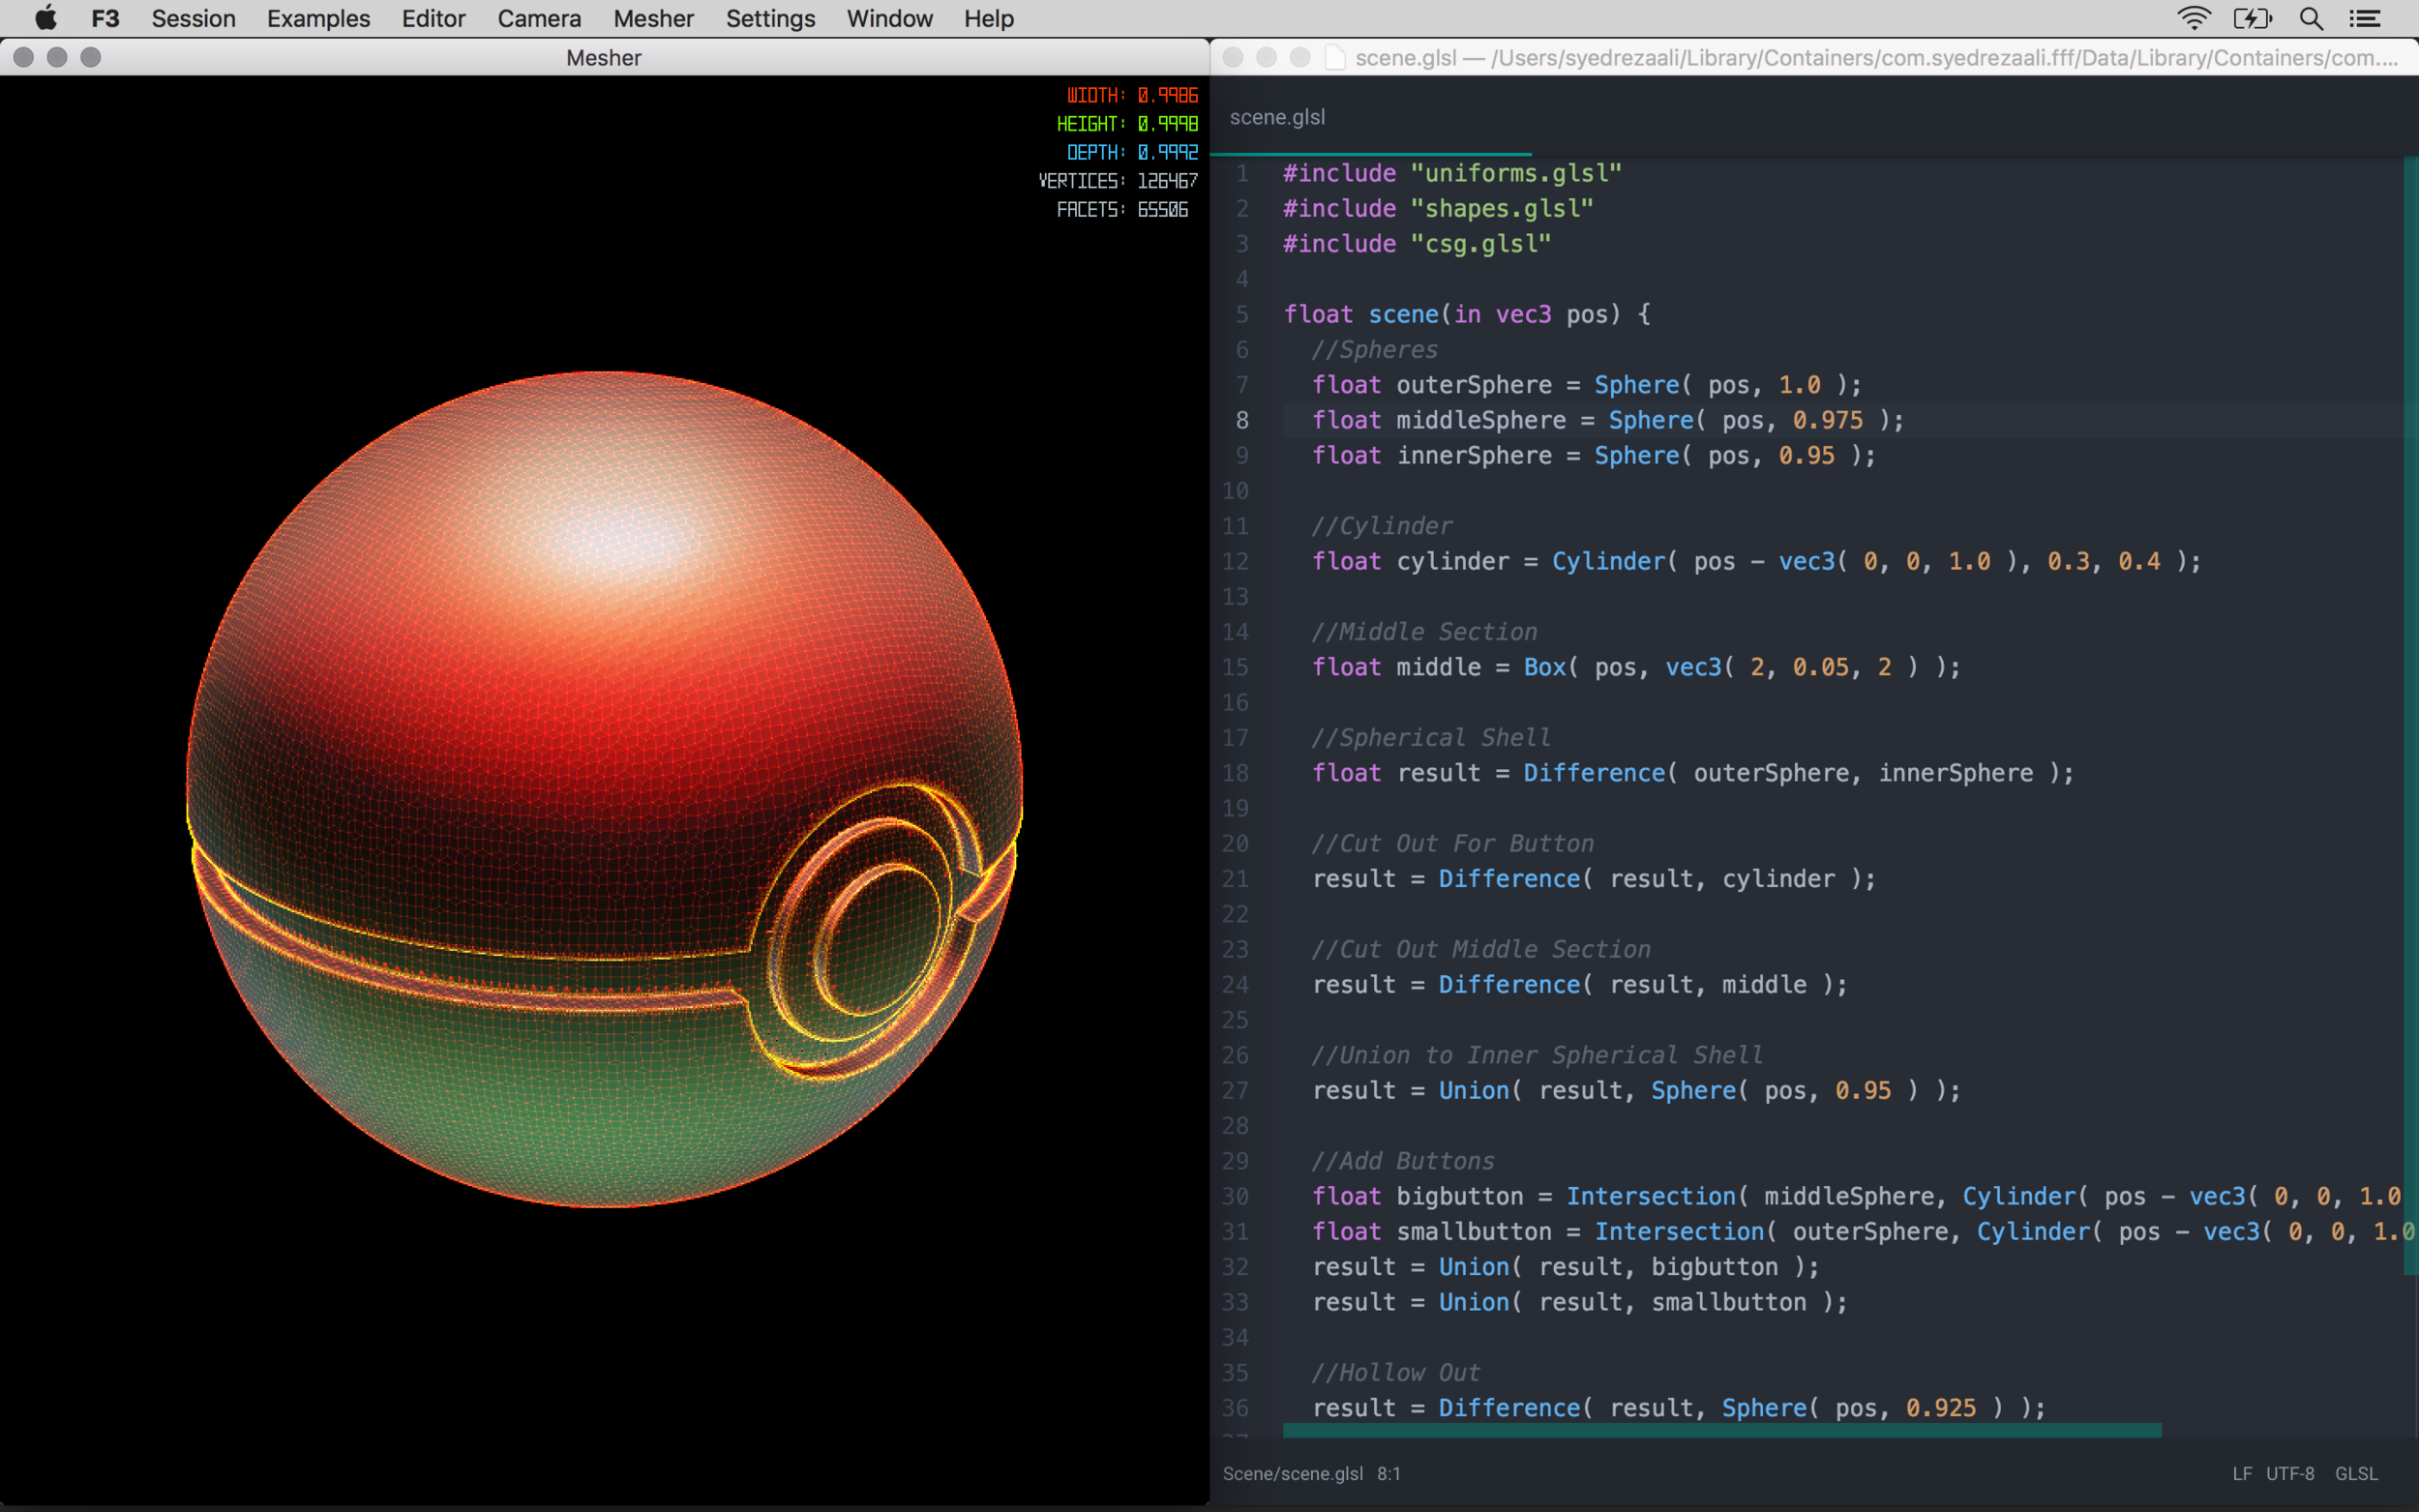
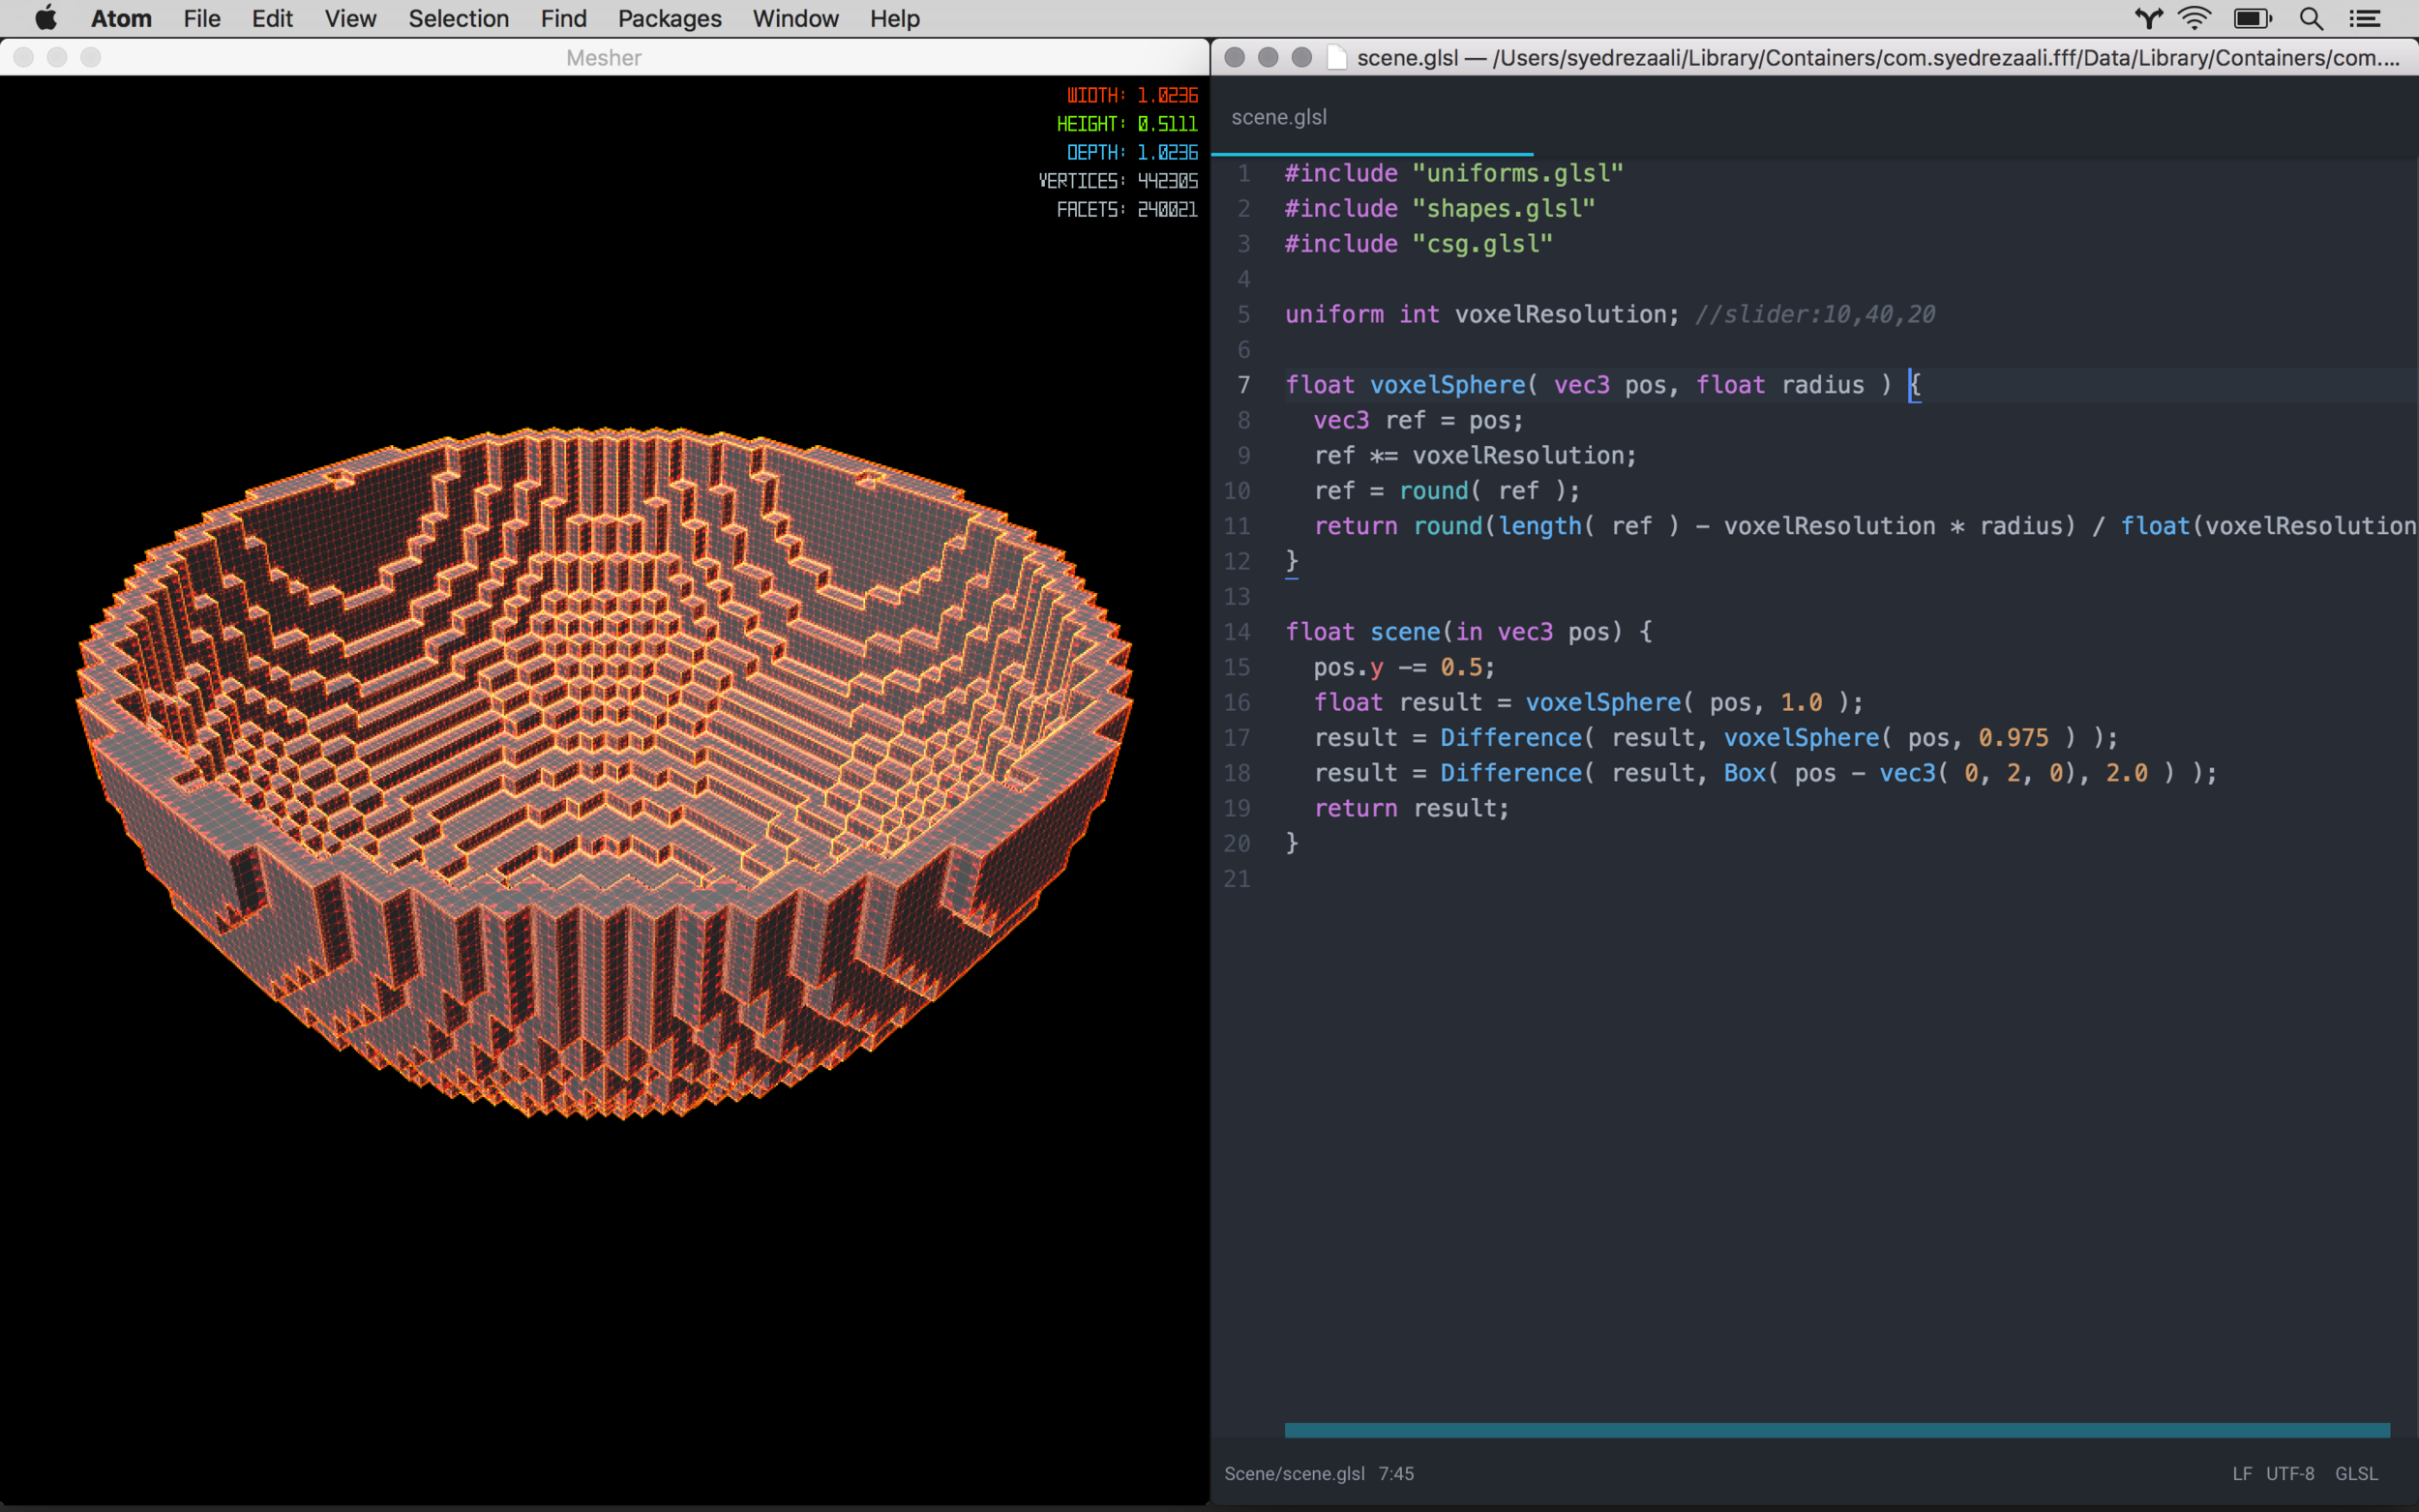
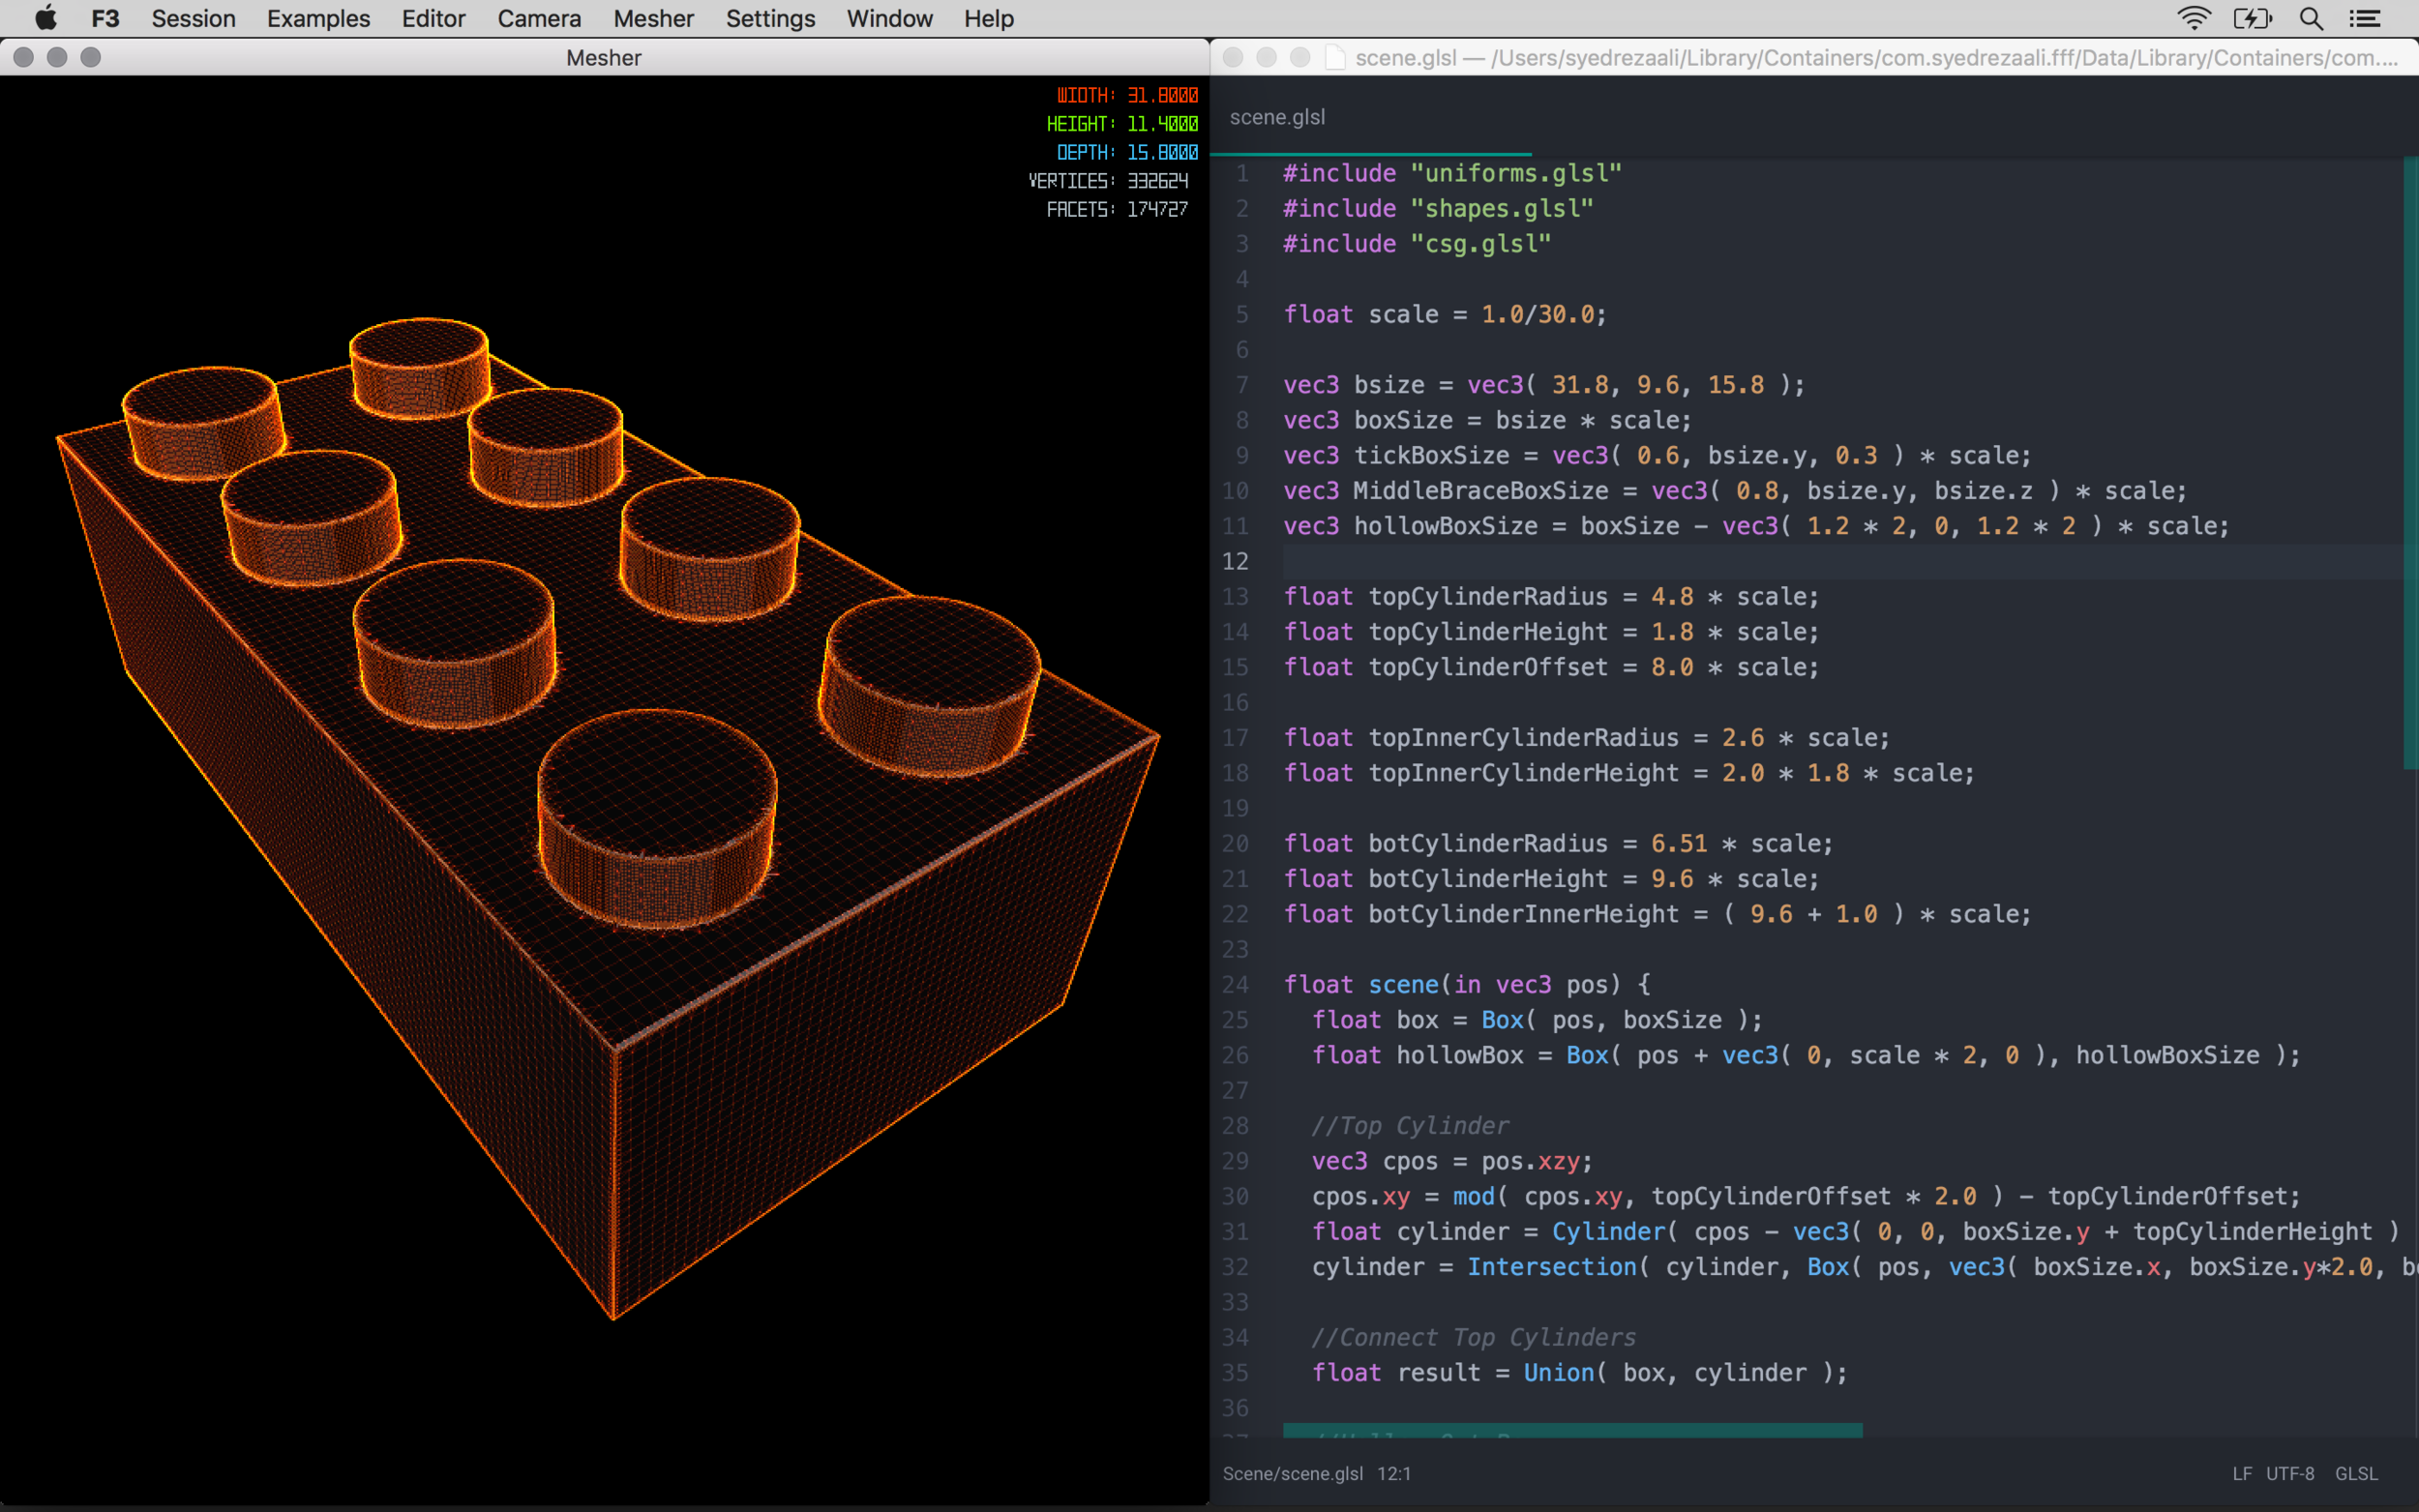
Mesher Window (Top Center):
The Mesher window shows you a preview of your form after its been processed and made into a mesh you can export. This window is great for tweaking the resolution & adaptation of the meshing algorithm, checking out the surface finish of the mesh and testing out different materials. This window can also show the mesh's wireframe, vertices, stats (properties like your form's dimensions, number of facets and vertices).
Slicer Window (Bottom Left):
The Slicer windows shows a real-time preview of the 2D slices that your form is made from. This window is helpful for debugging signed distance functions and for modeling form by cross-sections. Its amazing to see what the cross sections of forms look like, it really helps you think about form in another way. You can scrub through the slices by dragging on the window (left to right). The three rendering windows are helpful optional ways of viewing / debugging your form. You can use any or none of them while building your form!
Parameters Window (Bottom Center):
The Parameters window exposes UI controls, so you can tweak parameters of your form via sliders, dialers, buttons, toggles, range sliders, and 2D pads. This is super helpful for when you just want to dial in the right number or debug a form. The UI elements in this window are dynamically generated from comments next to your uniform variables in your GLSL code. There are many examples that show how to do this, but generally the format is as follow:
uniform float world; //[UI ELEMENT TYPE] uniform float hello; //[UI ELEMENT TYPE]:[LOW VALUE],[HIGH VALUE],[DEFAULT VALUE] Text Editor (Right):
The text editor window is of whatever text editor you feel like using to edit your form's code. F3 allows you to set your editor and can open it for you. So you don't have to find your code files, F3 will take care of that for you. More details on this below. Now that we've covered all the windows, the rest of this guide will cover how to get started.
Check for Updates Often:
Remember to check the Apple App Store for F3 App Updates! These updates are super important since F3 is a work in progress. These updates contain major bug fixes, new examples, and app enhancements (better meshing, exporting more types of file formats, etc)!
Set Your Text Editor:
F3 is centered around coding, this allows F3 to be extremely expressive and powerful! F3's coding language is GLSL [OpenGL Shading Language]. This allows F3 to be extremely fast when compiling and rendering form because the code you write is already in the perfect format to be ingested, interpreted and rendered by your GPU!
Instead of bundling a code editor inside of the app, F3 lets the user choose which code editor they feel most comfortable with. To set your code / text editor, go to: Editor > Set Editor, a dialog should pop up, navigate to your text editor application in the browser windows and select it. (I'd suggest using something like Sublime or Atom if you don't have one).
Open the Text Editor:
Now, we'll open the code that you'll be editing to make your magical shapes! Go to: Editor > Open Editor. This will open your test editor with the Shaders folder that you'll be working in. Specifically, you'll be editing the scene.glsl file inside of the Scene folder: ( Shaders / Scene / scene.glsl ). What's great about this open approach, is that you can include any GLSL code snippets in the Common folder and then you can include them in your scene.glsl file, by writing: #include "[filename].glsl" on top in the scene.glsl file! If this isn't making any sense, check out the examples to see how its done!
Check out the Examples:
Now that we've gotten familiar with F3's environment, lets check out some examples that come with the app. These examples are great for learning how to use SDFs for 3D modeling. For example if you want to see how to make sphere, go to: Examples > Primitives > Sphere. There are tons of other examples, some are very simple and others are more elaborate / complex. F3 icon was designed in F3, to see how it was made go to: Examples > Playground > F3 Logo. If you have your text editor open and are viewing the scene.glsl file, you'll probably notice the code is changing every time you open an example! This is by design so you don't have to navigate to a different folder every time you want to make something. This also means that if you don't save your session, then once you open a session or example your code will be over written! So be sure to save your session if you want to revisit your code. This brings us to our next section!
Create a New Session:
So you've seen how editing code in F3 works, now lets create a new session and make a simple Box. To do this go to: Session > New. Now open the code by opening your editor: Editor > Open Editor. Then modify your scene.glsl file. Specifically edit the scene function to return a Box. After you've edited your code, save and you'll see a box in the Render and Mesher windows. Congrats you've made your first form in F3!
float scene(in vec3 pos) { return Box( pos, 1.0 ); }Save Your Session:
Great, lets say you've made something you want to save and work on later. Lets save your session so you can come back to it later. To do this go to Session > Save As. F3 will then ask you where you'd like to save your session. Navigate to where you'd like to save, name your session and click "Save". One thing to note here is when you just Save via: Session > Save this saves your session to F3's working folder. You should always Save As if you want to save your Session for future visits. The working folder gets overwritten with the working files every time you load a Session or Example! So always save your work using SAVE AS!
Play with the Camera:
F3's 3D camera (in the Render & Mesher windows) can be set to rotate automatically in one or all directions (X, Y, Z). This allows you to see all side of your form so you don't have to keep switching contexts and lose your flow! Toggle the camera's x-axis rotation by: Camera > Toggle Rotation > X Axis. In addition, you can set your camera to predefined views (3D, Front, Right, Top, Back, Left, Bottom). For example to set your view to the top view: Camera > Set View > Top.
Tweak the Mesher Settings:
You might notice some artifact on your mesh, maybe the corners are a bit crunch or you don't have as smooth of a surface as your want! Don't worry, you can make it better by tweaking the Mesher Settings by editing the numbers (by clicking on them) in the Settings Menu. Here is a break down of the parameters and what they mean:
Resolution corresponds to the underlying voxel engine's resolution. The higher this number, the finer the mesh details. However this comes at a cost. 300 provides good enough resolution for sketching & prototyping, 600 is great for rendering images and movies. 900 is best for 3D printing objects with intricate details! The higher the number the more time will be needed to translate your code into a mesh.
Adaptation corresponds to how the underlying voxel engine will create the facets for the mesh. The higher the number, the harder then engine will try to reduce the number of vertices required to represent the mesh. If you are modeling organic shapes with no sharp corners then you can be pretty liberal with this number. Otherwise if you need to capture sharp corners as well as possible, then try a small value like 0.001 (the default in most examples).
The High and Low Thresholds correspond to signed distance field cut offs, so if you want to limit the input to the voxel engine to value below a certain range and above a certain range you can use these.
Model Scale corresponds to the scale of your form. You can show your mesh stats in the Mesher window by Mesher > Toggle Stats. This will show you how big your model is. If you wish to scale your model, you can use Model Scale to do so, thus, setting the model scale to 2 will double the size of your form. Setting the Model Scale to 0.5, will decrease your form's size by half! This is very useful for when you need to export a form and want it to be perfectly sized right out of F3!
Render Scale correlates to the size of the output images exported from F3 ( Session > Export > Image ... ). This number is the multiplier used. So if your want to save your Render window's content and the Render window's size is 500 by 500, then a Render Scale of 2 will result in an exported image of 1000 by 1000 pixels.
Export Your Form:
Give yourself a pat on the back! You made it this far! Now that you've made something awesome with F3, I'm sure you'd love to take your form somewhere else, either for 3D printing or high-fidelity rendering! To export your form as an OBJ, go to Session > Export > OBJ. You can also export an STL or an SVX (for uploading to Shapeways).
Export an Image or Movie:
Lets say you've made something cool and you want to share it with your friends online, well F3 has got you covered! You can easily export images (PNG, JPG, TIFF) and quicktime movies (MOV). F3's image & movie exporter can be accessed by Session > Export > Image & Session > Export > Movie So if you don't want to export an image of the Slicer window, then just close it before exporting. Exporting movies works in the same way!
F3's image exporter is super duper, it isn't just a exporting a screenshot. It exports a high resolution image! So lets say you wanted to render an image 2 or 4 or even 8 times the size of the window, you can set the Render Scale by selecting the number next to: Settings > Render Scale and changing it to whatever you'd like. Keep in mind that the higher the number, the longer it will take to make the image! Then export an image by: Session > Export > Image.
F3's movie exporter is even cooler! The movie exporter will render a movie for each rendering window open. So if you don't want to render all the windows, just close that window before exporting. Don't worry you can always re-open the window by using the Windows menu bar. For the Render and Mesher windows, the movie exporter will record one complete turntable rotation. (The rotation is based on which camera rotation axises you have on). For the Slicer window, the movie exporter will record one complete slicing sequence.
Built-in Uniforms:
Like Shadertoy.com, F3 gives you all the same uniforms (except for the channels). You can access them anytime (they come pre-included in your scene.glsl file: #include "uniforms.glsl" Here are the uniforms that are built in:
uniform vec3 iResolution;//resolution of the output window uniform float iAspect; //aspect ratio of the screen ( width / height ) uniform float iGlobalTime; //the time uniform float iAnimationTime;//time from 0.0 to 1.0 uniform vec4 iMouse; //mouse coordinate xy (if dragging) zw contained the last clicked position uniform vec4 iBackgroundColor; //the background color of the window uniform vec4 iDate; //Year, Month, Day, Time in Seconds uniform bool iPreview; //Will be turned on for the Render Window but off for the Mesher & Slicer F3 is deprecated as of Dec 2020
F3 was an experiment. Half art project, half commercial endeavor. By putting F3 on the App Store, I learned that no one codes, and documentation, coding support and a community forum is very important. Sometime I forget I’ve been coding for ~15 years and what is easy for me to wrap my head around might not be easy for others. I’d like to apologize to all the customers who reached out via email asking for help getting started. I should have planned better for supporting this app. Definitely a good lesson learned for the next one.